Installing Canine with Portainer Integration
Canine integrates with Portainer over a Docker network. Based on how you started Portainer, the installation instructions are slightly different.
1. (Optional) Create a Docker network for connectivity
If you installed Portainer with Docker Compose, you can skip this step.
Create a network called portainer_network by running the following command:
docker network create portainer_network
2. (Optional) Restart Portainer with the network attached
If you installed Portainer with Docker Compose, you can skip this step.
Stop the Portainer instance and rerun with:
docker run -d -p 8000:8000 -p 9443:9443 --name portainer --restart=always \
    --network portainer_network \
    -v /var/run/docker.sock:/var/run/docker.sock \
    -v portainer_data:/data \
    portainer/portainer-ce:lts
3. Create a Portainer access token
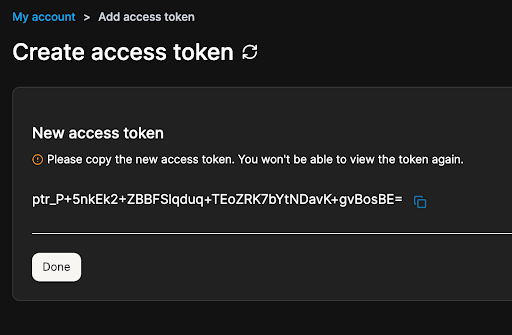
Go to your Portainer dashboard, and navigate to My Account > Access tokens > + Add access token, and create a new access token.
4. Install Canine
Use Canine's Docker Compose Portainer configuration to boot Canine with Portainer.
curl -fsSL https://raw.githubusercontent.com/CanineHQ/canine/refs/heads/main/install/portainer/docker-compose.yml -o canine-compose.yml
Once you have downloaded the compose file, you can start it with:
docker compose -f canine-compose.yml up
5. Account setup
When Canine first boots, by default, it will be on localhost:3000, and you'll immediately be taken to the account setup page.
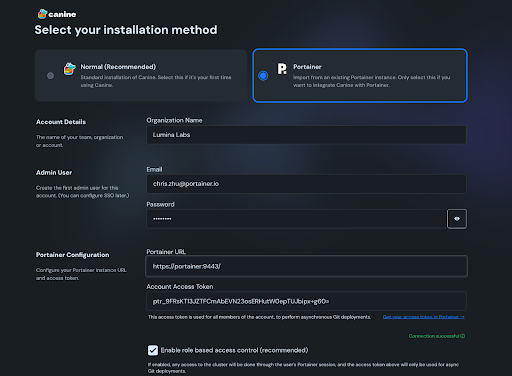
Select Portainer for installation method. Set the Portainer URL to https://portainer:9443 and paste in the access token from above.
Canine is now installed and integrated with Portainer!