OIDC Authentication
OpenID Connect (OIDC) allows you to authenticate Canine users through your organization's identity provider, enabling single sign-on (SSO) with services like Okta, Auth0, Azure AD, Google Workspace, and others.
Why Use OIDC?
- Industry Standard - OIDC is built on OAuth 2.0 and widely supported by identity providers
- Single Sign-On - Users authenticate with their existing corporate credentials
- Automatic Discovery - Configuration is simplified through OIDC discovery endpoints
- Team Provisioning - Automatically sync user groups to Canine teams
Prerequisites
Before configuring OIDC authentication, ensure you have:
- An OIDC-compatible identity provider (Okta, Auth0, Azure AD, Google, etc.)
- Admin access to create an application/client in your identity provider
- The issuer URL for your identity provider
Configuration
Navigate to Account > Authentication > + Add OIDC Provider in your Canine dashboard.
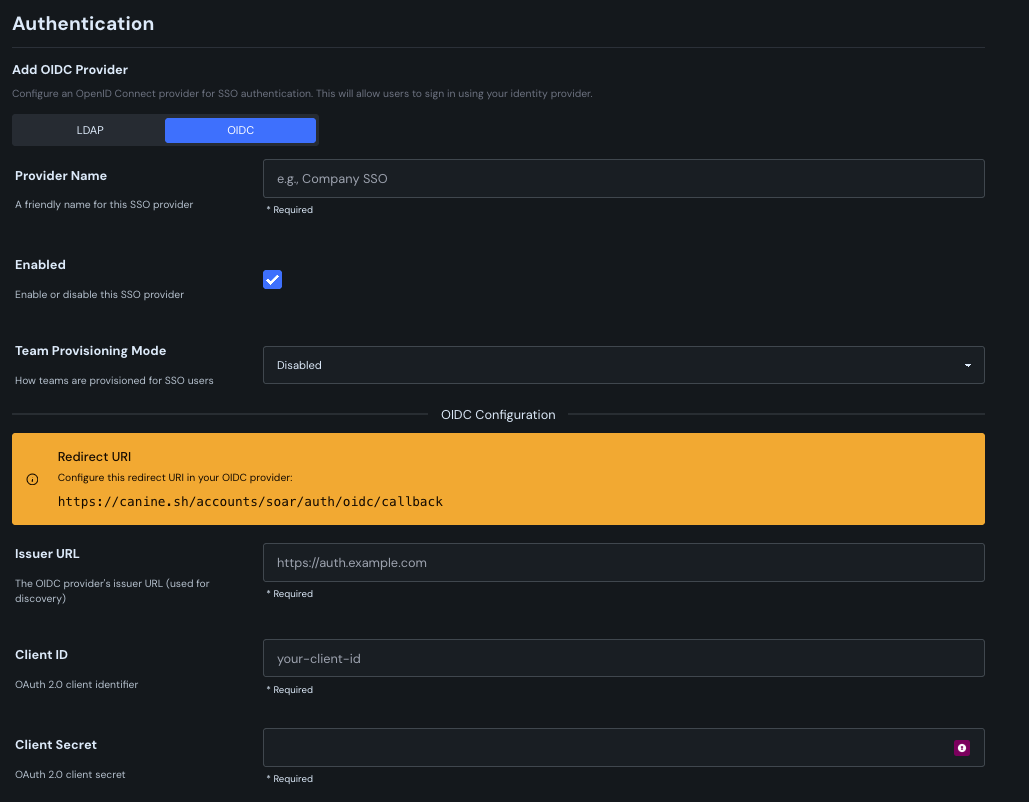
Basic Settings
| Setting | Description | Example |
|---|---|---|
| Provider Name | A friendly name for this SSO provider | Company SSO |
| Enabled | Toggle to enable or disable this provider | Enabled |
| Team Provisioning Mode | How teams are provisioned for SSO users | Disabled or Just In Time |
OIDC Configuration
Redirect URI
Before configuring your OIDC provider settings in Canine, you must first register Canine's redirect URI in your identity provider:
https://<your-canine-host>/accounts/<your-account>/auth/oidc/callback
If you're using the cloud version of Canine, your host is canine.sh.
Provider Settings
| Setting | Description | Example |
|---|---|---|
| Issuer URL | The OIDC provider's issuer URL (used for discovery) | https://auth.example.com |
| Client ID | OAuth 2.0 client identifier from your provider | your-client-id |
| Client Secret | OAuth 2.0 client secret from your provider | your-client-secret |
| Scopes | Space-separated list of scopes to request | openid email profile |
The default scopes openid email profile are sufficient for most use cases. Only modify this if your identity provider requires additional scopes for group membership or other claims.
Advanced Settings
If your identity provider does not support OIDC discovery, expand Advanced Settings to manually configure endpoints and claim mappings.
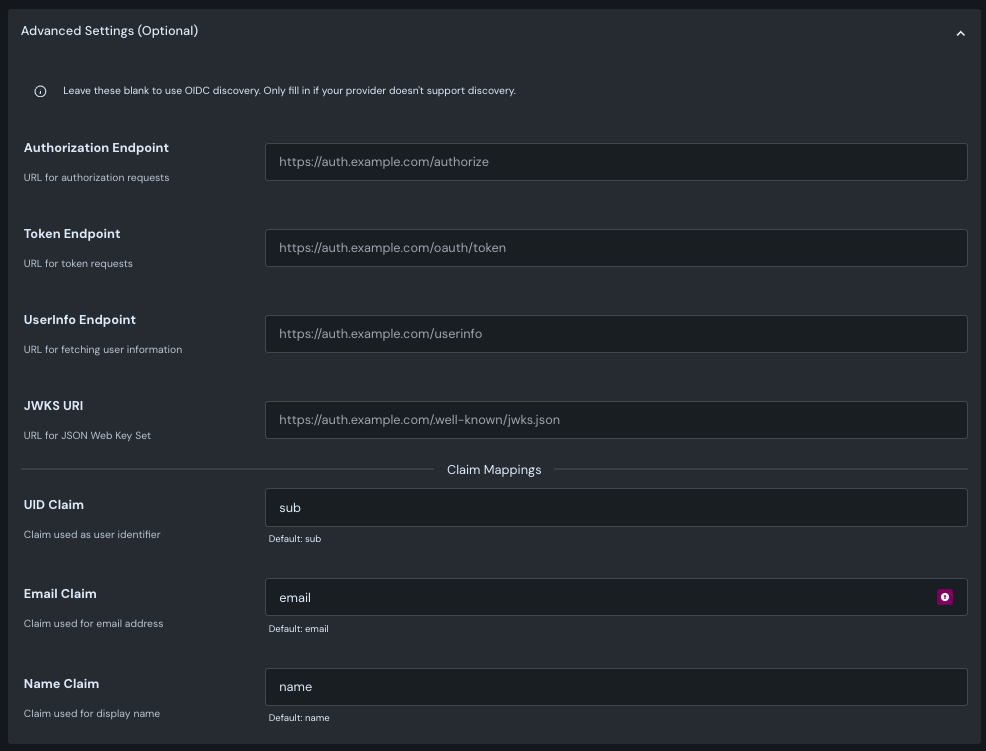
Endpoint Configuration
Leave these blank to use OIDC discovery. Only fill in if your provider doesn't support discovery.
| Setting | Description | Example |
|---|---|---|
| Authorization Endpoint | URL for authorization requests | https://auth.example.com/authorize |
| Token Endpoint | URL for token requests | https://auth.example.com/oauth/token |
| UserInfo Endpoint | URL for fetching user information | https://auth.example.com/userinfo |
| JWKS URI | URL for JSON Web Key Set | https://auth.example.com/.well-known/jwks.json |
Claim Mappings
Customize how user attributes are mapped from your identity provider's claims.
| Setting | Description | Default |
|---|---|---|
| UID Claim | Claim used as user identifier | sub |
| Email Claim | Claim used for email address | email |
| Name Claim | Claim used for display name | name |
Team Provisioning
When Team Provisioning Mode is set to Just In Time, Canine automatically syncs a user's identity provider groups to Canine teams when they log in. On each login:
- The user is added to Canine teams that match their current identity provider groups
- The user is removed from Canine teams if they no longer belong to the corresponding group
Identity Provider Setup Guides
Okta
- In Okta Admin Console, go to Applications > Create App Integration
- Select OIDC - OpenID Connect and Web Application
- Configure the redirect URI:
https://canine.sh/accounts/<your-account>/auth/oidc/callback - Note the Client ID and Client Secret
- Your Issuer URL is typically:
https://<your-domain>.okta.com
Auth0
- In Auth0 Dashboard, go to Applications > Create Application
- Select Regular Web Applications
- In Settings, add the redirect URI to Allowed Callback URLs
- Note the Domain, Client ID, and Client Secret
- Your Issuer URL is:
https://<your-domain>.auth0.com
Azure AD (Microsoft Entra ID)
- In Azure Portal, go to Azure Active Directory > App registrations > New registration
- Add the redirect URI under Authentication > Web
- Create a client secret under Certificates & secrets
- Note the Application (client) ID and Directory (tenant) ID
- Your Issuer URL is:
https://login.microsoftonline.com/<tenant-id>/v2.0
Google Workspace
- In Google Cloud Console, go to APIs & Services > Credentials
- Create an OAuth 2.0 Client ID for a Web application
- Add the redirect URI to Authorized redirect URIs
- Note the Client ID and Client Secret
- Your Issuer URL is:
https://accounts.google.com
Troubleshooting
Invalid Redirect URI
- Verify the redirect URI in your identity provider exactly matches:
https://canine.sh/accounts/<your-account>/auth/oidc/callback - Check for trailing slashes or protocol mismatches
Discovery Failed
- Verify the Issuer URL is correct and accessible
- Ensure there are no network restrictions blocking the connection
- If your identity provider does not support the standard
/.well-known/openid-configurationdiscovery endpoint, use the Advanced Settings to manually configure endpoints